
Are you planning to grow and sell your own coffee or just like a caffeine addicted feline, curious about the process? Don’t worry this cat will just be focused and awake from drinking lots of coffee. If your answer is a big “Meow” which means “Yes” then read on.
Coffee farming and production involves the following stages in the process:
- Planting the seeds
- Harvesting and Picking the Cherries
- Selecting the Cherries
- Pulping the Cherries
- Fermenting the Cherries
- Drying the Beans
- Storing the Beans
- Milling the Beans
- Roasting the Beans
- and finally the fun part, Shipping, Grinding and Brewing the Coffee.
Did you know that people across the globe love coffee? After all, it’s projected for the coffee industry to grow to over $143.4 billion by 2025.
In the United States alone, the coffee shops industry maintains a 4.2% growth momentum, which means more people can enjoy their coffee for years to come.
Quick Table Reference
|
Stage in the Process |
Duration |
Care Instructions |
Tips |
|---|---|---|---|
| Planting the seeds |
1 year in nursery beds 3-5 years before coffee berry production |
Use nursery beds until the seeds grow into plants between 18-24" high. After that, plant the seeds in the field. |
Prune coffee trees to ensure they stay within 8-10' in height. |
| Harvesting and Picking the Cherries |
8-10 days |
Use manual picking and get only the ripest among the cherries. |
Cherries grow in stages, meaning you can’t pick all at once. Once you start harvesting, go back after 8-10 days to get the rest. |
| Selecting the Cherries |
1-3 days depending on quantity |
Get rid of the debris first before sorting the cherries. Choose the best and ripest among them for the next step. |
Use water immersion for a faster sorting process. Unripe cherries float to the top, making them easy to remove. |
| Pulping the Cherries |
1 day after selecting the cherries |
Use a de-pulping machine to get rid of the skin and the majority of the pulp. |
If you’re a “zero waste” producer, you can use the pulp and skin to make tea or compost. |
| Fermenting the Cherries |
12-48 hours |
This process has three methods: wet, semi-washed, and dry. If you have limited resources, use the dry method. |
The safest method is the wet method since it makes the coffee get a more consistent flavor. |
| Drying the Beans |
2-4 weeks |
Make sure to rake the cherries for them to dry evenly. It also prevents mold or microbes from developing. The target moisture content for the beans is 11-12%. |
Use large, flat spaces to dry the beans out in the sun. If you have the means, you can use machines to dry them out automatically. |
| Storing the Beans |
1 day or a few months/years for “aged” green coffee |
Ensure that the storage pallets have good airflow. Encase the beans into sacks and keep them away from moisture. |
If you aren’t looking to make “aged” coffee, send the beans as soon as possible for milling. |
| Milling the Beans |
1 day |
This process involves hulling, which removes the beans’ parchment covering as well as its skin and leftover dry fruit. Ensure that they fall off while preserving the beans. |
If you want to make your coffee beans shiny, polishing them is a supplemental step. Take note, this process doesn’t impact the final taste of the coffee. |
| Roasting the Beans |
Varies |
Depending on the amount of time spent, the coffee product will have different flavors. Pay attention to the amount of time spent roasting the beans since it can ruin the taste if you put it for too long. |
The shorter the roasting time, the more caffeine will remain. Keep that in mind if you want to make milder coffee blends. |
| Shipping, Grinding and Brewing the Coffee | Varies |
Get a reputable online platform and ensure that the packaging is durable and attractive. That way, it’s marketable and won’t get damaged while in transit. |
Do your research if you want to profit from selling coffee products. That way, you’ll find a suitable market once the time comes. |
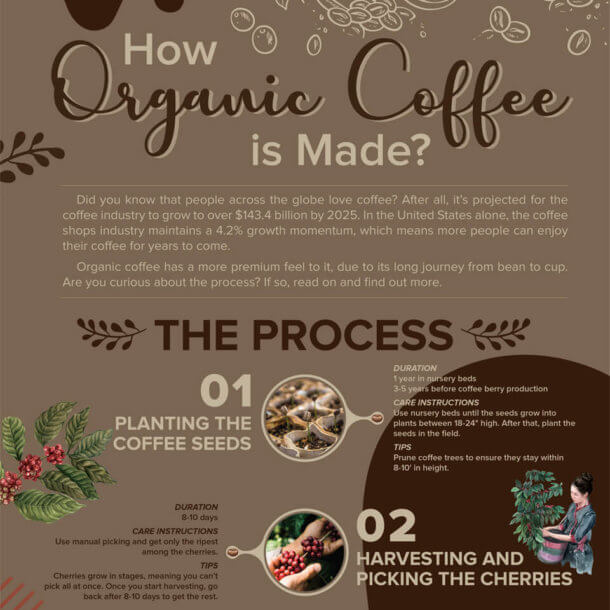
1.) Planting the Coffee Seeds
The journey of the coffee from seed to cup won’t start by throwing seeds on the ground and let nature take its course.
You need to ensure that they’re planted in the right environment and care for them constantly.
Coffee beans come from seeds that undergo the drying, roasting and grounding processes. Otherwise, you can use the seeds to grow coffee trees. In usual situations, you can plant the coffee seeds in shaded nurseries, where it will spend its first year.
Once planted in large beds, you need to water the seedlings frequently. Make sure they’re shaded from bright sunlight until they’re strong enough for a more permanent soil. To ensure that they’re tough enough, make sure that they grow to around 18-24″.
Once the plant gets to this length, you can plant it in the field. Take note, coffee trees can grow up to 20’ if you leave it alone. This makes harvesting trickier, so make sure to prune it around 8-10′.
Most farmers will plant their coffee seeds during the wet season, ensuring that the soil is moist while the roots become more established.
2.) Harvesting the Cherries
Newly-planted coffee trees will often take 3-5 years to start bearing fruit. This depends on the variety of the plant.
Regardless, the coffee cherries’ color will turn into a bright, deep red as soon as it ripens and ready for harvest.
Typically, small-scale farmers have one major harvest every year, using their relatively small land to keep their quality high. They hand-pick the crop—it’s a labor-intensive and difficult process to ensure the freshness of the coffee cherry. In other countries like Brazil, they mechanize it due to the relatively flat landscape.
Our coffee comes from small-scale farmers located in Maramag, Bukidnon. We buy them for a better price than the usual market price since they can produce high-grade coffee products.
Selective Picking
Our farmers use this method of harvesting since they only get ripe cherries. They will rotate among the trees every 8-10 days. This type of harvesting is more costly, but the results are worth it since it only produces the finest Arabica and Robusta beans.
Good farmers will harvest approximately 100-200lbs of coffee cherries per day. This makes 20-40lbs of coffee beans. This translates to about 20% of the entire harvest since well-harvested coffee cherries can impact the final taste of the beans.
After carefully weighing their hauls, they use motorcycles to carry 2-3 sacks of ripe cherries. After all, they’re located deep in the Bukidnon mountains, making the trek difficult. They ride for hours, giving it to a waiting jeepney that delivers them to us for processing.
3.) Selecting the Coffee Cherries
What you’re after is the two tiny beans at the center of the coffee fruit.
To get the best beans, sorting them is important, and there are a few methods available for you. The simplest method is to do it by hand while using a large sieve to winnow the beans, removing stones, twigs, and other debris.
Another method to select the best ripe cherries is to immerse them in water. Once done, you’ll know the difference in density between ripe and unripe coffee cherries. After all, the latter will float to the top, making it easy to extract.
4.) Pulping the Coffee Cherries
This step focuses on removing the skin and mucilage surrounding the beans.
De-pulping is necessary when using wet and semi-washed fermentation methods. Within a day of picking the cherries, farmers put them through a de-pulping machine, which removes the skin and almost all the pulp.
Both skin and pulp become part of the compost. But some coffee producers implement a “zero waste” policy. That means they will use these materials and make new products like tea from the cherry skins.
After the de-pulping step, the beans will have some remaining pulp. This will help in the fermentation process that follows.
5.) Fermenting the Coffee Cherries
We process the coffee cherries as soon as we receive them.
This prevents the fruit from losing its freshness. Here are two ways we use to process the cherries:
Dry Method
This is the more traditional method of processing coffee, especially when there isn’t a lot of water. We spread out the freshly-picked cherries on huge surfaces, letting the sun dry them. To avoid spoilage, we rake and turn them as the day progresses.
At night or during rainy days, we cover them to ensure they stay dry. That’s why the process might take several weeks to finish a batch of coffee since it depends on the weather. The target moisture of the cherries should be 11% before the next step.
Semi-washed Method
This method removes the skins of the cherry during the pulping process. Instead of removing the entire mucilage, it leaves the sticky flesh layer surrounding the beans. This allows a certain level of ongoing fermentation during the drying process.
With this method, farmers produce Honey or Pulped Natural coffee. The mindboggling part is that no washing occurs during this process. The result is a coffee with more body and fruitier compared to the ones produced by the wet method.
Wet Method
This method is more modern since it removes the coffee cherry pulp after harvesting. That way, the bean will dry with only the parchment skin. It’s done by passing the freshly-harvested cherries through a pulping machine.
As the beans pass through water channels, they’re separated by weight. The lighter ones will float while the heavier, riper beans will sink. After that, they’re classified by size by passing through rotating drums.
Once done, they’re transported to water-filled fermentation tanks. The beans will stay in the tanks for 12-48 hours depending on their condition, the climate, and altitude. This ensures that the mucilage attached to the parchment will dissolve.
The beans should feel rough after the fermentation process. They’re rinsed by passing through more water channels. After that, they’re ready to dry.
6.) Drying the Beans
Regardless of the fermentation method, the beans need to have a moisture content of 11%, as mentioned above.
For the wet method, the fermentation already happened during the prior step. That means the remaining step is drying them up.
For cherries that fermented using the semi-wash or dry method, the beans will ferment while drying out. This process can either be mechanical or using a large, flat space under the sun. You need to rake the cherries to ensure their even dryness.
It’s done as the day progresses since it might develop bacteria or molds. If the weather doesn’t look favorable, a farmer needs to run fast and cover the cherries from the rain. In typical situations, it takes about 2-4 weeks to dry them out to 11-12% moisture content.
The dry and semi-washed process allows the beans to dry with the pulp. This ensures that the taste characteristics of the fruit gets carried over. It’s risky since it needs careful and even drying or fungi and other microbes will ruin the flavor of the coffee bean.
7.) Storing the Beans
After drying, you’ll get parchment coffee.
These are beans with surrounding bits of dry fruit and skin after using the dry fermentation method. Otherwise, these beans will only have a layer of parchment remaining.
You can store the coffee for several months or years in this form. It depends on the temperature and humidity of your storage area. You should only wait for this long if you’re planning to sell “aged” green coffee products.
Most manufacturers often send off the beans for milling as soon as possible. During their storage period, they’re placed into sacks and placed on pallets. These areas should allow for good airflow since it will keep them away from unnecessary moisture.
8.) Milling
This is the final stage before getting the beans out into the open.
By the time it’s done, the coffee won’t have any extra layers. It involves two steps: hulling and polishing.
Hulling
Farmers throw the beans into a machine that mills it, removing the parchment covering. It also gets rid of the skin and leftover dry fruit if it’s a dry-processed coffee. This is a complex process since the little bits should come off while preserving the beans.
Polishing
To make shiny beans, this optional step removes all the silver skin left on them. It doesn’t make any difference to the final taste of the product. Regardless, once completing the hulling process, you’ll have beautiful coffee beans—dried out and light brown.
9.) Roasting the Beans
Roasting the organic coffee beans needs the perfect timing and the right temperature.
It’s essential since meeting these requirements ensures that you get the perfect final product. During this process, the beans will split and their coating will go away.
The strength of the coffee’s flavor will depend on the roasting formula. For instance, coffee makers will roast the beans longer to produce more intense flavors. But the trade-off is the lower caffeine content.
After all, the shorter its roasting time is, the more caffeine remains. Take note, manually roasting the coffee beans that a particular batch might have a slight taste difference. Beans roasted for even a few minutes shorter or longer can make the entire batch taste different.
10.) Shipping, Grinding and Brewing the Coffee
After we roast the batch of coffee beans, we pack and sell them through Amazon.
Once delivered to your doorstep, you can grind the beans regardless of your brewing methods. It’s best used for methods like a drip, espresso, or pour-over.
To extract the coffee properly, you need quality filtered water. Its temperature should be somewhere between 195°F and 205°F. As for the dosage, one tablespoon is enough for an average serving or 15g for every 4-6oz of water.
Download the Info-graphic poster without giving your Email.
Because you read the entire article here is your reward.
Just click on the DOWNLOAD button below and you will be able to download the info-graphic instantly without opting-in to our email list. We would appreciate a shout out if you are going to share it in your channel.

The Best Filipino Organic Coffee
As a global competitor, the Philippines isn’t the biggest. The best part is that they produce some of the best blends out there. After all, the organic farmers in places like Bukidnon take their coffee-growing seriously.
Organic coffee is rare in the United States, so if you’re looking for a healthier option, this coffee is a great choice. The variety of regional coffee at your disposal is a great way of finding the taste that works best with you.
Taste the difference of delicious Filipino Specialty Coffee with every cup.

Filipino Organic Coffee
Quality Grade: 85.75%
Try Bean to Mug today and enjoy the premium taste of our coffee. Don’t hesitate and start your day with a delicious mug of coffee today.

Marc Abucejo
Bean to Mug Founder
Marc is a Filipino Organic Coffee Lover and Founder of the Bean to Mug Movement. A Registered Nurse living in Los Angeles; he is very passionate and dedicated in sharing the Filipino Culture through all-natural coffee beans from the Philippines.